Mastering Mortise Gauges: The Key to Precision in Woodworking
Mortise gauge types: Discover the essential role of mortise gauges in woodworking, their types, usage techniques, and tips for maintaining accuracy.

Understanding Mortise Gauges: Definition and Purpose
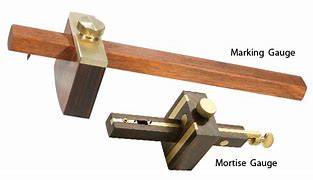
A mortise gauge is a specialized woodworking tool specifically designed for marking mortise and tenon joints with remarkable precision. Its primary function is to assist carpenters and woodworkers in creating accurate markings that ensure tight-fitting joints in furniture and cabinetry. This precision in woodworking is vital, as it directly affects the overall quality and durability of the finished product. The design of a mortise gauge typically includes two pins or spurs that allow for simultaneous marking of both sides of a mortise, thereby enhancing the accuracy of the cuts made.
For example, when constructing a wooden frame for a door, a mortise gauge can be employed to mark the exact width needed for the mortise. This ensures that the tenon fits snugly into the mortise, contributing to a stronger and more stable structure. Without such precision, the door frame could become misaligned, leading to structural weaknesses or aesthetic issues. Moreover, the mortise gauge is invaluable in traditional joinery applications, where the integrity of the joint is critical to the performance and longevity of the piece. Understanding the tool’s purpose is essential for woodworkers aiming to produce high-quality results.
Types of Mortise Gauges
There are several types of mortise gauges available, each designed for specific tasks in woodworking. The most common type is the dedicated mortise gauge, which features two pins for marking both sides of a mortise simultaneously, allowing for greater accuracy. Additionally, combination mortise gauges can function as both a marking gauge and a mortise gauge, which provides versatility for various projects. These types are especially useful for woodworkers who may not have the space for multiple tools, as they can perform multiple functions with a single gauge.
Mortise gauges are typically made from durable hardwood such as rosewood, which is known for its strength and resistance to wear. Many models feature brass components that add to their durability and longevity. Some mortise gauges also include advanced features like a double-beam for enhanced accuracy around tools like chisels, which can be particularly beneficial when working on intricate designs. Adjustable mortise gauges allow users to modify the width setting quickly, accommodating various mortise sizes, making them a preferred choice for projects requiring diverse joint dimensions. This adaptability makes it easier for woodworkers to achieve precise results without needing multiple gauges for different sizes.
How to Use a Mortise Gauge
Using a mortise gauge properly is essential for achieving the best results in woodworking projects. To begin, set the distance between the spurs to match the width of the mortise chisel you plan to use. Once adjusted, position the gauge against the wood and slide it to create a clear marking line. For added accuracy, it is advisable to use a try square and marking knife to outline the mortise before utilizing the gauge. This preparatory step helps ensure that the marked lines are straight and true, providing a solid foundation for subsequent cuts.
In practical applications, such as cabinet-making, precise mortise and tenon joints are critical for the structural integrity of the furniture. A mortise gauge can help ensure the correct width is marked, allowing for a snug fit of the tenon. When using the gauge, ensure that it is held perpendicular to the workpiece during marking to create clean, accurate lines that will guide your chiseling and cutting efforts. Regular practice with the mortise gauge can significantly enhance one’s speed and precision in marking mortises, ultimately contributing to better craftsmanship and higher-quality projects.
Importance of Accuracy
Accuracy is paramount when using a mortise gauge, as it directly impacts the integrity of the wood joints. Inaccurate markings can lead to misaligned joints, which not only compromise the structural stability of the finished product but can also result in wasted materials and increased project costs. The design of mortise gauges promotes high precision, ensuring that measurements are exact for effective joinery and reducing the risk of costly mistakes.
For example, if a woodworker miscalculates the width of a mortise, it may lead to an ill-fitting tenon that requires additional adjustments, wasting materials and time. Furthermore, a well-calibrated mortise gauge can enhance the overall quality of a project by ensuring that all joints fit together seamlessly. Consistent accuracy minimizes material waste and reduces the need for corrections during assembly, allowing for a more efficient workflow. Ultimately, the importance of accuracy cannot be overstated, as it is foundational to successful woodworking.

Maintaining Your Mortise Gauge
Proper maintenance of a mortise gauge is essential for ensuring its longevity and performance. To maintain optimal functionality, it is crucial to keep the gauge clean and free from resin and debris that can accumulate during use. This maintenance step helps prevent any interference with the marking process. Regularly checking and adjusting the pins is also important to ensure they remain sharp and functional, as dull pins can lead to inaccurate markings and frustration during projects.
For instance, storing the mortise gauge in a protective case when not in use can prevent damage and keep the tool in good working condition. Additionally, periodic inspections for wear or damage can help identify issues before they affect performance. Applying a light oil to moving parts can also maintain smooth adjustments and prevent rust, ensuring the mortise gauge operates effectively for years. Routine maintenance not only prolongs the life of the tool but also ensures that it consistently delivers accurate results, which is essential for high-quality woodworking.
Mortise Gauge vs. Marking Gauge

Mortise Gauge Types: Understanding the difference between a mortise gauge and a marking gauge is essential for woodworkers, as each tool serves a unique purpose. Mortise gauges are characterized by their two spurs that allow for simultaneous marking of both sides of a mortise, making them ideal for joinery tasks. In contrast, marking gauges typically feature a single spur, designed primarily for general marking purposes such as scribing lines along the grain or for layout work.
Combination gauges can serve dual purposes, which is particularly beneficial for woodworkers with limited workspace or for those just starting in the craft. While both tools are valuable in their own right, mortise gauges often provide greater precision for specific tasks compared to general marking gauges, making them a preferred choice for joinery projects. For instance, a woodworker working on a complex piece of furniture would likely choose a mortise gauge to ensure the mortises are marked accurately, whereas a marking gauge might be sufficient for simple line scribing. Understanding these distinctions can help woodworkers select the right tool for their specific needs.
Mortise Gauge Types Techniques for Enhanced Precision
To improve marking techniques when using a mortise gauge, lightly pressing the gauge is recommended to avoid damaging the wood and to ensure smoother markings. Highlighting scribed lines with a pencil can enhance visibility, making it easier to follow during cutting and chiseling. This step can be particularly useful when working on darker woods or intricate designs where the original line may be difficult to see.
Additionally, adjusting the spur to find the center of a workpiece by marking from both edges can help achieve more accurate results. This technique is especially useful in projects requiring symmetrical designs. Consistency is key; maintaining uniform pressure while marking will ensure that the depth of the line remains consistent across the entire marking. For angled cuts, adjusting the gauge to match the angle of the workpiece will provide better alignment and improve the overall quality of the cut. Mastering these techniques can dramatically enhance a woodworker’s efficiency and the precision of their work.
Features to Look for in a Mortise Gauge
When selecting a mortise gauge, several features should be considered to ensure versatility and functionality. Look for models with an adjustable spur that allows for easy modifications in marking different widths. A locking thumb screw is also beneficial, providing consistent distance settings that prevent accidental adjustments during use. This feature is particularly helpful when working on multiple joints of the same size, as it allows for quick and easy setting without the need for continuous recalibrating.
Ergonomics play a significant role in comfort and control, so evaluating the handle design is essential. Some mortise gauges feature built-in rulers or measuring scales, which can serve as quick references during marking, enhancing efficiency in woodworking tasks. Consideration of these features will help you choose a mortise gauge that best suits your needs and enhances your woodworking experience. Additionally, reading reviews or seeking recommendations can provide insights into the performance and longevity of different models, ensuring you invest in a quality tool.
Mortise Gauge Types Common Mistakes to Avoid
When using a mortise gauge, certain common mistakes can hinder accuracy and performance. One of the most significant errors is applying excessive pressure while marking, as this can damage the wood and lead to inaccurate lines. Finding the right balance in pressure is essential for achieving clean, precise markings. Regular maintenance should not be neglected, as it ensures the gauge remains functional and effective, thereby preventing issues that could arise from using a worn or damaged tool.
Moreover, it’s crucial to ensure that the gauge is correctly set before starting any marking to avoid incorrect measurements. Overlooking the importance of a clean marking surface can also lead to uneven lines and inaccurate cuts, which can affect the quality of the joints. Finally, failing to practice technique may result in inconsistent markings and poor joint fit. By being aware of these common pitfalls, woodworkers can improve their overall marking accuracy and project outcomes.
The Essential Role of Mortise Gauges in Woodworking
Mortise Gauge Types: Mortise gauges are indispensable tools for precise woodworking, particularly in joinery tasks. A thorough understanding of their features, uses, and maintenance can significantly enhance the quality of woodworking projects. The ability to accurately mark mortises is foundational to many furniture-making processes, allowing woodworkers to create strong and aesthetically pleasing joints. Mastery of the mortise gauge not only elevates a woodworker’s skills but also opens the door to more complex and intricate designs.
For instance, a skilled woodworker who can effectively use a mortise gauge can tackle sophisticated projects such as cabinetry with intricate inlays and dovetail joints. By utilizing this tool correctly and understanding its importance in the woodworking process, woodworkers can achieve results that reflect both precision and craftsmanship, ultimately elevating their work and reputation in the craft. The mortise gauge, therefore, stands as a testament to the importance of accuracy and skill in woodworking.
