10 Beginner Woodworking Projects

10 Beginner Woodworking Projects You Can Finish in a Weekend

10 Beginner Woodworking Projects. Getting started with woodworking doesn’t mean you need a full workshop, years of experience, or endless free time. In fact, some of the most satisfying woodworking projects are small, practical builds you can complete in a single weekend.

If you’re new, you may want to start with our complete guide to essential woodworking tools for beginners before diving into your first build.


1. Simple Wooden Shelf

 

A basic wooden shelf is one of the best starter projects. You’ll practice measuring, cutting straight lines, drilling pilot holes, and mounting hardware.

For tool recommendations, see our guide on woodworking measuring tools every beginner should own.

  • Skills learned: measuring, level installation, fastening

2. Rustic Coffee Table

Rustic coffee table beginner woodworking project

A rustic coffee table introduces you to frame construction and basic joinery. Using construction lumber or reclaimed wood keeps costs low.

If you want detailed plans, check out our beginner furniture woodworking projects guide.

  • Skills learned: frame assembly, sanding, finishing

3. Wooden Birdhouse
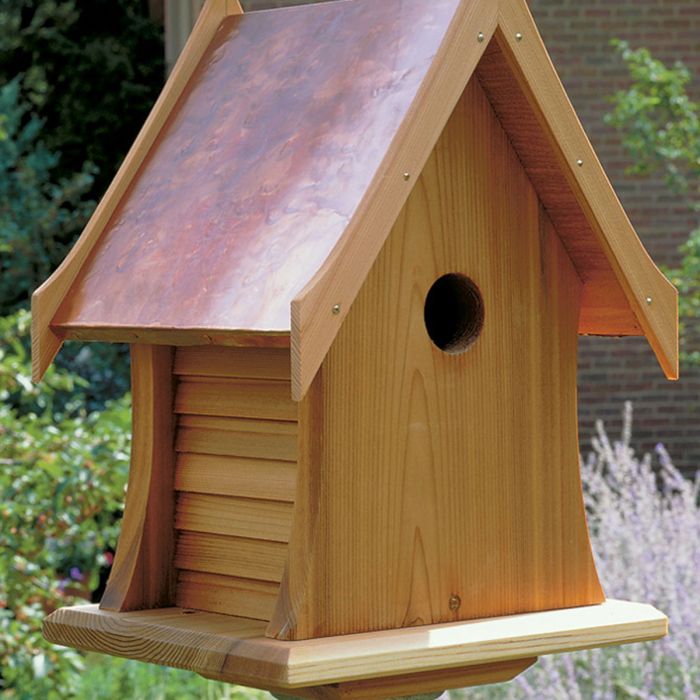
 

Birdhouses are classic beginner projects and perfect for scrap wood.

Learn more about safe materials in our article on choosing the best wood for beginner projects.

  • Skills learned: angled cuts, small assembly

4. Storage Crate or Box

Wooden storage crate DIY beginner woodworking project

A wooden storage crate helps you master square corners and clean assembly.

For joinery tips, see basic woodworking joints explained for beginners.

  • Skills learned: box construction, squaring joints

5. Small Side Table

Small side table beginner woodworking project

Side tables are confidence-building projects that look impressive but remain beginner-friendly.

You’ll want clamps for this build — here’s our review of the best woodworking clamps for beginners.

  • Skills learned: leg alignment, tabletop attachment

6. Wooden Planter Box

Wooden planter box beginner woodworking project

Planter boxes are forgiving outdoor projects and perfect for learning fast assembly.

See our full guide on outdoor woodworking projects for beginners for more ideas.

  • Skills learned: exterior assembly, weatherproofing

7. Bench-Top Tool Organizer

Workbench tool organizer beginner woodworking project

A bench-top organizer keeps your tools accessible and saves time on every future project.

Pair this with our woodworking workshop organization tips.

  • Skills learned: layout planning, compartment sizing

8. Wooden Picture Frame

Wooden picture frame beginner woodworking project

Picture frames teach precision cuts and tight-fitting joints.

For cutting accuracy, read our guide on how to make accurate miter cuts.

  • Skills learned: miter cuts, precision fitting

9. Simple Workbench

Simple DIY workbench beginner woodworking project

A sturdy workbench is the foundation of every woodworking shop.

We break this down step by step in our beginner DIY workbench plans.

  • Skills learned: structural framing, leveling

10. Scrap Wood Projects

Scrap wood projects for beginner woodworking

Scrap wood projects let you practice without pressure or waste.

Browse more ideas in our scrap wood woodworking projects guide.

  • Skills learned: creativity, problem-solving

Final Thoughts

These beginner woodworking projects are designed to build confidence fast while producing real, usable results. Each project prepares you for more advanced builds as your skills grow.

For a structured learning path, explore our main hub:
Beginner Woodworking Projects – Complete Starter Guide

A Guide to Cutting Finger Joints

A Guide to Cutting Finger Joints

A Guide to Cutting Finger Joints. Finger joints, also known as box joints, are a classic woodworking joint known for their strength, clean appearance, and versatility. They are commonly used in boxes, drawers, cabinets, and furniture corners where both durability and visual appeal matter.

A Guide to Cutting Finger Joints

In this guide to cutting finger joints, you’ll learn what finger joints are, why they’re useful, the tools required, and step-by-step methods to cut them accurately—even in a home workshop.

What Are Finger Joints?

Finger joints consist of evenly spaced rectangular “fingers” cut into the ends of two boards. When interlocked and glued together, these fingers create a strong mechanical bond with a large surface area for glue.

Unlike butt joints, finger joints resist pulling apart and twisting, making them ideal for projects that need strength without visible fasteners.

Why Use Finger Joints in Woodworking?

Finger joints are popular for several reasons. First, they are extremely strong due to the increased glue surface. Second, they are visually attractive, especially when cut cleanly and aligned precisely. Finally, they are versatile and work well with many types of wood.

Finger joints are commonly used for:

  • Wooden boxes and storage crates
  • Drawer construction
  • Small cabinets
  • Decorative furniture corners

For beginners looking to move beyond basic joints, finger joints are an excellent next step.

Tools Needed to Cut Finger Joints

You don’t need an advanced workshop to cut finger joints, but accuracy is essential. Common tools include:

  • Table saw or router
  • Finger joint jig (shop-made or commercial)
  • Clamps
  • Measuring tools and square
  • Wood glue

A jig is the most important component. It ensures consistent spacing and prevents errors that can ruin the joint.

Method 1: Cutting Finger Joints with a Table Saw

Using a table saw with a finger joint jig is one of the most popular methods.

Step 1: Set up a dado blade or standard blade depending on finger width. The blade width determines the size of each finger.

Step 2: Attach the jig to the miter gauge and align the indexing pin with the blade.

Step 3: Make the first cut, then slide the board over the indexing pin to position the next cut.

Step 4: Repeat the process until the entire edge is cut.

Repeat the same process for the mating board, ensuring proper alignment so the fingers interlock cleanly.

Method 2: Cutting Finger Joints with a Router

A router table fitted with a straight bit can also be used to cut finger joints. This method is quieter and often preferred for smaller projects.

Step 1: Install a straight router bit sized to match the desired finger width.

Step 2: Use a finger joint jig or router fence with an indexing pin.

Step 3: Make shallow passes to avoid tear-out and maintain control.

This method provides excellent results when done carefully.

Tips for Perfect Finger Joints

Accuracy is the key to clean finger joints. Always test your setup on scrap wood before cutting final pieces.

  • Use sharp blades and bits
  • Double-check measurements
  • Clamp workpieces securely
  • Sand lightly after assembly

If joints are too tight, lightly sand the fingers. If too loose, adjust the jig spacing and recut.

Gluing and Assembling Finger Joints

Apply glue evenly to all mating surfaces. Assemble the joint carefully and use clamps to apply even pressure. Avoid over-tightening, which can squeeze out too much glue.

Wipe away excess glue before it dries to maintain a clean appearance.

A Guide to Cutting Finger Joints

Final Thoughts

Finger joints combine strength, precision, and visual appeal, making them one of the most rewarding joints to learn. While they require patience and accuracy, the results are well worth the effort.

If you’re building your skills and want a structured learning path, explore our complete beginner resource: Home Woodworking for Beginners.

Woodworking Bench Clamp

Woodworking Bench Clamp: A Must-Have Tool for a Stable Workbench

A woodworking bench clamp is one of the most important tools in any home workshop. While many woodworkers focus on cutting and shaping tools, proper clamping is what keeps your work accurate, safe, and enjoyable. Bench clamps are specifically designed to hold workpieces firmly against a workbench, allowing you to work with confidence and precision.

Whether you’re sanding, drilling, planing, or assembling a project, a reliable bench clamp can make a huge difference in the quality of your results.

What Is a Woodworking Bench Clamp?

Woodworking Bench Clamp

A woodworking bench clamp is a clamping device designed to secure wood directly to a workbench. Unlike portable clamps that hold pieces together, bench clamps anchor your project to the bench itself, preventing movement during work.

Bench clamps are commonly used with workbenches that include dog holes, slots, or clamp tracks, but many styles can also be mounted directly to the bench surface.

Why Bench Clamps Are Essential in Woodworking

Stability is critical in woodworking. Even slight movement can lead to inaccurate cuts, uneven sanding, or dangerous tool slips. Bench clamps eliminate this problem by keeping your workpiece firmly in place.

They are especially useful for:

  • Sanding flat surfaces
  • Planing boards
  • Drilling precise holes
  • Routing edges
  • Chiseling joints

For beginners, bench clamps provide extra control and reduce the risk of mistakes or injuries.

Types of Woodworking Bench Clamps

There are several types of bench clamps available, each suited to different workshop setups and tasks.

Bench Dog Clamps: These clamps fit into dog holes on a workbench and apply pressure horizontally or vertically. They are ideal for holding boards flat on the bench.

Quick-Release Bench Clamps: These clamps allow for fast adjustment and are perfect for repetitive tasks or frequent repositioning.

Fixed Bench Clamps: Mounted directly to the bench, these clamps provide strong, consistent holding power for heavy-duty work.

Hold-Down Clamps: Designed to apply downward pressure, these clamps are excellent for planing and sanding operations.

Key Features to Look for in a Bench Clamp

When choosing a woodworking bench clamp, focus on features that match your type of work.

Clamping Force: Strong holding power ensures your workpiece stays put, even during aggressive tasks like planing.

Ease of Adjustment: Quick and smooth adjustment saves time and reduces frustration.

Compatibility: Make sure the clamp fits your workbench design, including dog hole size or mounting options.

Durability: Metal clamps generally last longer and handle heavier workloads than plastic models.

How Many Bench Clamps Do You Need?

The number of bench clamps you need depends on the size and type of projects you work on. For most home woodworkers, two to four bench clamps provide enough flexibility for everyday tasks.

Larger projects or frequent bench work may require additional clamps to hold longer boards or multiple pieces at once.

Bench Clamps vs Portable Clamps

Portable clamps such as F-clamps and bar clamps are incredibly versatile, but they are not always ideal for securing workpieces to a bench. Bench clamps excel at holding wood flat and stable during hands-on operations.

Most workshops benefit from having both. Portable clamps handle assembly and glue-ups, while bench clamps provide stability during shaping and finishing.

Final Thoughts on Woodworking Bench Clamps

A woodworking bench clamp is a foundational tool that improves accuracy, safety, and efficiency in your workshop. By keeping your work firmly in place, bench clamps allow you to focus on craftsmanship rather than control.

If you’re building your home workshop or upgrading your setup, bench clamps are an investment that pays off in better results and greater confidence. For a complete beginner guide to tools and workshop setup, visit our main resource: Home Woodworking for Beginners.

Woodworking Corner Clamps

Woodworking Corner Clamps: The Essential Tool for Perfect 90-Degree Joints

Woodworking corner clamps are one of the most valuable tools you can add to your workshop, especially if you build cabinets, boxes, frames, or furniture. These clamps are designed to hold pieces of wood at a perfect 90-degree angle, making assembly easier, more accurate, and far less frustrating.

Woodworking Corner Clamps

Whether you’re a beginner working from a small home workshop or an experienced DIYer tackling more advanced builds, corner clamps can dramatically improve the quality of your projects.

What Are Woodworking Corner Clamps?

Woodworking corner clamps—also known as right-angle clamps—are tools specifically designed to hold two pieces of wood together at a 90-degree angle. Unlike standard clamps, which mainly apply pressure in one direction, corner clamps align and secure joints at the same time.

This makes them ideal for projects where square corners are critical. Boxes, drawers, frames, cabinets, and shelving units all benefit from the accuracy that corner clamps provide.

Why Corner Clamps Are So Important in Woodworking

Achieving perfectly square corners by hand can be difficult, especially when glue is involved. Wood can shift as clamps are tightened, leading to uneven joints and misaligned builds.

Corner clamps solve this problem by locking pieces into position before you apply pressure. This ensures your joints stay square while the glue dries or while you drill and fasten screws.

They are particularly useful for:

  • Cabinet and drawer construction
  • Picture frames and frames of all sizes
  • Box and crate projects
  • Furniture assembly

For beginners, corner clamps reduce mistakes and make woodworking more enjoyable.

Types of Woodworking Corner Clamps

There are several types of corner clamps available, each suited to different woodworking needs.

Single-Handed Corner Clamps: These clamps allow you to secure pieces with one hand, leaving the other free to position your work. They are ideal for solo woodworkers.

90-Degree Angle Clamps: These clamps are fixed at a right angle and provide consistent accuracy. They are perfect for repetitive tasks like cabinet assembly.

Corner Clamp Sets: Some projects require multiple clamps at once. Sets allow you to clamp all corners of a project simultaneously, keeping everything aligned.

Key Features to Look for in Corner Clamps

When choosing woodworking corner clamps, it’s important to focus on build quality and usability.

Material Strength: Metal clamps are more durable and provide stronger holding power, while plastic clamps are lighter and suitable for small projects.

Jaw Capacity: Make sure the clamp can accommodate the thickness of the wood you typically use.

Ease of Adjustment: Smooth adjustment mechanisms save time and reduce frustration during assembly.

Stability: A stable clamp keeps your workpiece from shifting while tightening.

How Many Corner Clamps Do You Need?

The number of corner clamps you need depends on the projects you build. For most home woodworkers, starting with two clamps is sufficient. This allows you to secure opposite corners while checking alignment.

For box or cabinet projects, owning four corner clamps allows you to secure all corners at once, resulting in faster assembly and better accuracy.

Corner Clamps vs Standard Clamps

Standard clamps like F-clamps and bar clamps are versatile, but they aren’t designed to hold pieces at a precise angle. Corner clamps fill this gap by combining alignment and pressure into one tool.

Most workshops benefit from having both. Standard clamps provide overall pressure, while corner clamps ensure accuracy at the joints.

Final Thoughts on Woodworking Corner Clamps

Woodworking corner clamps are a must-have tool for anyone who builds square projects. They improve accuracy, reduce mistakes, and make assembly faster and more enjoyable.

If you’re serious about improving your carpentery skills, investing in quality corner clamps is a smart move. For a complete beginner roadmap and tool guidance, visit our main guide: Home Woodworking for Beginners.

Best Woodworking F-Clamps

Best Woodworking F-Clamps: A Complete Guide for Home Woodworkers

Best Woodworking F-Clamps. F-clamps are one of the most versatile and essential tools in any woodworking workshop. Whether you’re a beginner building simple projects at home or a more experienced woodworker tackling furniture builds, having the right F-clamps can make your work safer, easier, and more accurate.

In this guide, we’ll explain what woodworking F-clamps are, why they’re so useful, how to choose the best ones, and what features matter most when buying them.

What Are Woodworking F-Clamps?

Best Woodworking F-Clamps. F-clamps

F-clamps are named after their distinctive “F” shape. They consist of a long metal bar with a fixed jaw on one end and an adjustable sliding jaw on the other. A threaded screw handle allows you to apply pressure and hold wood pieces firmly in place.

Because of their design, F-clamps can apply strong, even pressure while remaining lightweight and easy to handle. This makes them ideal for gluing, assembling, drilling, and holding workpieces steady during cuts.

Why F-Clamps Are Essential for Woodworking

One of the biggest advantages of F-clamps is their versatility. They can be used for small craft projects as well as larger furniture builds. Unlike some clamps that are limited to specific sizes or tasks, F-clamps adapt easily to different woodworking needs.

They are especially useful for:

  • Gluing boards and panels
  • Holding pieces square during assembly
  • Securing wood while drilling or sanding
  • Temporary positioning of parts before fastening

For home woodworkers, F-clamps offer professional-level holding power without taking up much storage space.

Key Features to Look for in the Best F-Clamps

Not all F-clamps are created equal. When choosing the best woodworking F-clamps, there are several important features to consider.

Bar Strength: A strong steel bar prevents bending under pressure. Heavier-duty bars are better for large projects, while lighter bars are perfect for small jobs.

Jaw Capacity: Jaw opening determines how thick a project the clamp can handle. It’s smart to own a variety of sizes for different tasks.

Throat Depth: This measures how far the clamp can reach into a workpiece. Deeper throats are useful for panels and wide boards.

Handle Comfort: Ergonomic handles make tightening easier and reduce hand fatigue during longer projects.

Heavy-Duty vs Light-Duty F-Clamps

Heavy-duty F-clamps are built for strength and durability. They’re ideal for furniture building, large glue-ups, and projects requiring significant pressure. These clamps are often made from thicker steel and feature reinforced jaws.

Light-duty F-clamps, on the other hand, are perfect for beginners and small projects. They’re easier to handle, less expensive, and great for light assembly work.

Most home woodworkers benefit from owning a mix of both types.

How Many F-Clamps Do You Need?

A common saying in woodworking is that you can never have too many clamps. While that may be true, beginners can start with a small, practical set.

A good starting point is:

As your projects grow in size and complexity, you can expand your collection over time.

Final Thoughts on the Best Woodworking F-Clamps

F-clamps are a must-have tool for any woodworking workshop. They are affordable, versatile, and incredibly useful for a wide range of projects. By choosing high-quality clamps with strong bars, comfortable handles, and the right jaw capacity, you’ll improve both the quality and safety of your work.

If you’re just starting out, focus on a small selection of reliable F-clamps and build your collection as needed. For a complete beginner roadmap, visit our main guide: Home Woodworking for Beginners.

You cannot copy content of this page